 Activating CostGuard Activating CostGuard
 Activating CostGuard turns on the features that you’ve purchased. Once you activate CostGuard, you have unlimited functionality. You must purchase and install the program before you can activate CostGuard. For information on purchasing, click here. For information on installing click here. If you do not activate CostGuard, then you can run the program in Demo Mode. For more information on Demo Mode, click here.
Requesting Activation Codes
The first step is to request the activation codes. Once you receive them, then you need to enter them into the program. To begin this process, you need to get to the Demo Mode popup. You can get to this popup by starting CostGuard.
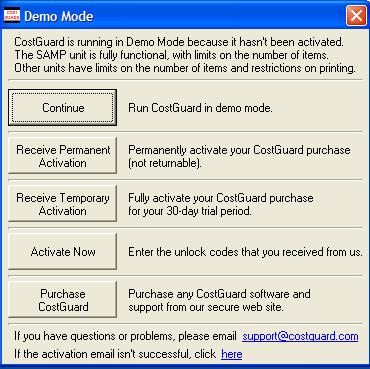
1. Click the Receive Permanent Activation or Receive Temporary Activation button. This will send an email to CostGuard.
Temporary Activation lets you use the fully functional version of CostGuard for a certain time period, and retains your trial period. Your trial period ends within 30 days of purchase, or when you request a Permanent Activation, whichever comes first. If you want to test CostGuard without the limits of Demo Mode, then you should click this button. Before the 30 days are up, you will need to convert to Permanent Activation. If you do not, then CostGuard will revert to Demo Mode. For more information on Demo Mode, click here. When you receive your Permanent Activation Codes, return to this screen and follow the directions starting with step 4.
2. If you see a message saying that your email couldn’t be sent, then click the here in the last line. Make sure you include the requested information with the email.

3. In a short period of time, you should receive an email back from CostGuard with the Activation Codes. While you are waiting, you can use the program in Demo Mode or close the program until the codes arrive.
Entering Activation Codes
4.
When you receive the codes, keep the email open so you can cut
and paste the codes in the activation screens. Or you can print
out the email and have it handy. If you have closed CostGuard, start
it again, and click the  button.
When you see the popup below, click the button that corresponds to the computer you are activating.

5. Special Note for activating on a Server: you must access this screen from the server, and you must activate the server before any other workstations.
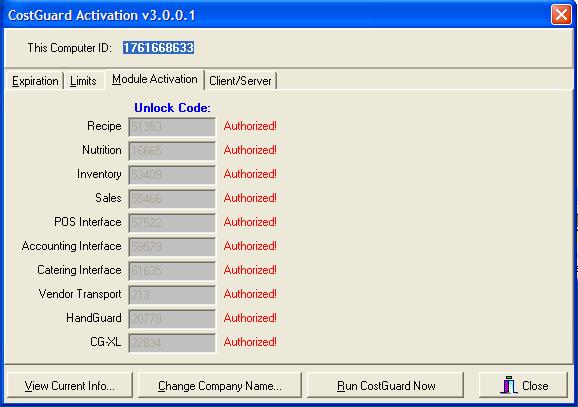
6. The activation screen will appear. This is where you will enter in the codes from the email. What you enter will depend on the kind of activation you are requesting: Permanent or Temporary.
Check that the Computer ID in the email matches the ID number at the top of the Activation Screen. If it does not, contact CostGuard at support@costguard.com for help.
7.
The Activation Codes and Dates that you
receive depend on which modules, interfaces, and support plans you purchased.
As you view the following screens, if you did not purchase a particular
component, the code will not be in the email.
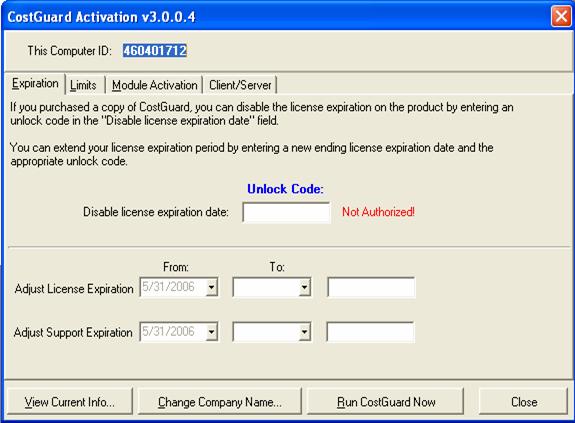
8. Type in or Copy and Paste from the email, your “Disable license expiration” date if it is in the email. Type in your activation dates and codes for the “Adjust License Expiration” or “Adjust Support Expiration”.
When finish typing in the number, the Not Authorized! will change to Authorized! If it does not, try typing or copying the number again. Double check that the computer ID in the unlock email matches your computer ID. If it still doesn’t work, email CostGuard at support@costguard.com.
9. Click the Limits tab. If received, Enter your Recipe Limit and the “Adjust Recipe Limit” code here. If this doesn’t work, make sure that the ‘from’ AND the ‘to’ boxes are the same. If you purchased the Transfer component of the Multi-Unit Controller, enter the “Adjust Unit Limit” and “Transfer” codes. If you purchased the network version, then enter “Adjust Workstation Limit” code.
If you did not purchase the Multi-Unit or the Network, leave these fields blank. When finish typing in the number, the Not Authorized! will change to Authorized! If it does not, try typing or copying the number again. Double check that all of the digits match. If it still doesn’t work, email CostGuard at support@costguard.com.

10. Click the Module Activation Tab. Type in the Activation Codes next to the components that you purchased. If you did not purchase a component, then leave the field blank.
Later, if you decide to purchase additional components, you can add the activation numbers without re-installing the program. When finish typing in the numbers, the Not Authorized! will change to Authorized! If it does not, try typing or copying the number again. Double check that all of the digits match. If it still doesn’t work, email CostGuard at support@costguard.com.
11. If you are activating a standalone PC, skip to the next step. If you have a network, and you purchased the “Client/Server Database” version, click the box in front of that option. If you click this box and don’t own a Client/Server license, you will receive a startup error.

12. At this time, you can change your Company Name. For more information on how to change your name, click here.
13.
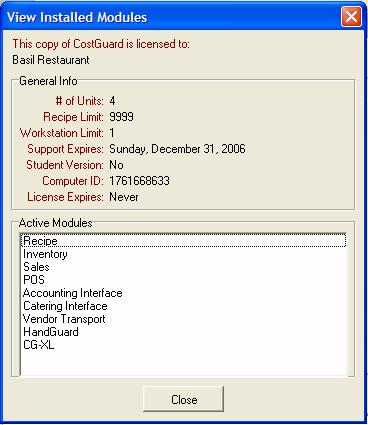
To view your purchased modules and limits, click  button. The View Installed Modules popup will
appear. Click Close to exit the popup.
button. The View Installed Modules popup will
appear. Click Close to exit the popup.
Later, you can view this information at anytime by clicking Help, then View License Information.
14.
To start CostGuard, click  button. You
will return to the program and the login screen. You now have a
fully functional version of the program.
button. You
will return to the program and the login screen. You now have a
fully functional version of the program.
15. Read the following options for more information on what to do next.
Networks: If you installed CostGuard to a Server and Workstations and activated your server, and you haven’t activated your workstations, click here. Do this first before the other options. When you are finished, return to the tutorial and choose one of the other options if needed.
Upgrades: If you are upgrading from an earlier version of CostGuard and wish to convert your data, click here.
If neither option above applies to you, click here to go to the main program overview.